Email Personalization within Journey Builder

Who said that automated emails should be simply transactional or generic messages?

The classic “Dear #FirstName,” email is not that welcome anymore. As marketers, we have a duty to sparkle the light that lies within our customer’s eyes at every interaction. That should happen at every email communication you are sending out, be it the monthly newsletter manual send or that dripping email automation you’ve just set up.

Personalization seems, to most of us, like an unattainable Grail. Yet, it is simply a matter of data. It’s having the right information, available to be leveraged by the Marketing tool for your communications. This implies that your Central Database is in phase with your Marketing Cloud. But is it?

When you orchestrate your marketing initiatives with Marketing Cloud connected to Salesforce and you wish to personalize your message, you need to be able to leverage Salesforce fields within Marketing Cloud. That’s currently achieved through Marketing Cloud Attributes mapped with Salesforce fields. Marketing Cloud attributes are, indeed, mappable to Lead and Contact or Account fields. When you wish to personalize your email communications, you simply use one of those %%MarketingCloudAttribute%%. So far so good.

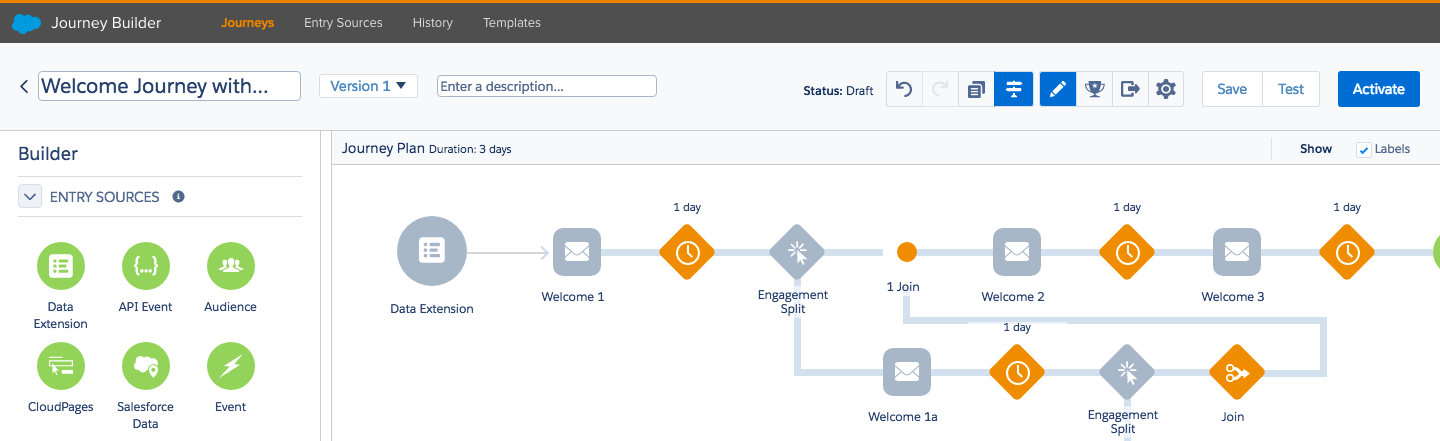
Things could become less straightforward when you automate your Marketing initiatives with Journey Builder and you wish to personalize your message in emails sent within a Journey.

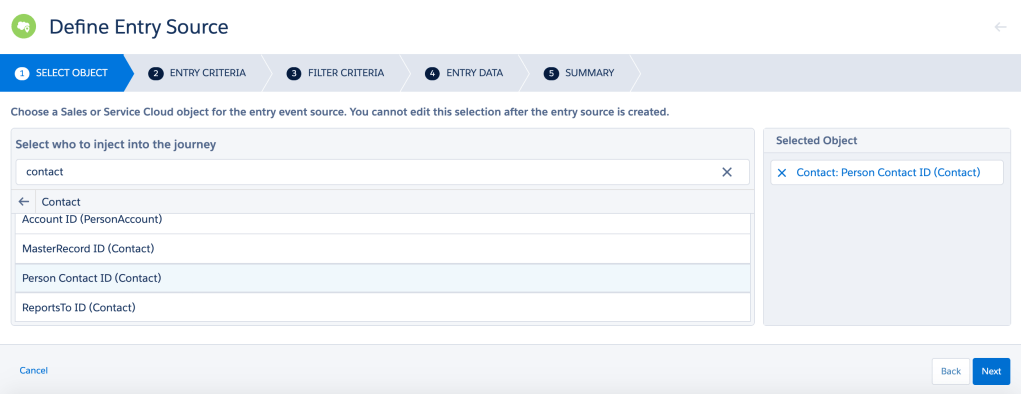
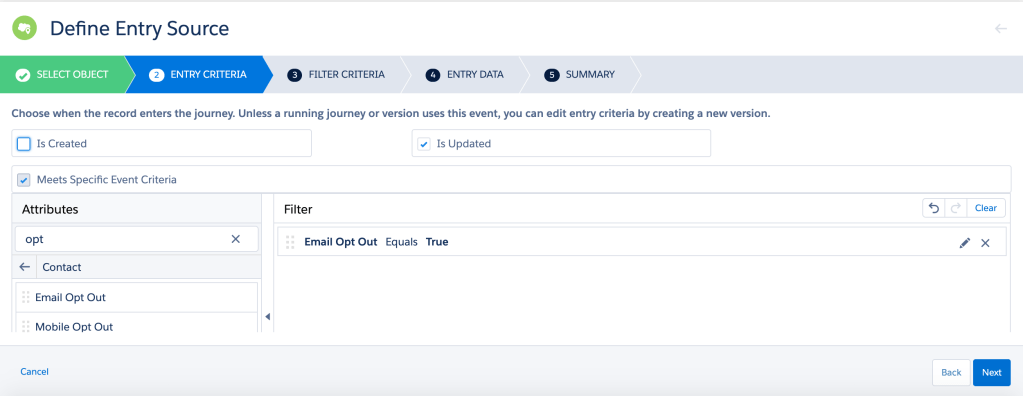
Every Entry Source is based on a Data Extension, whether you explicitly choose Data Extension as Entry Source or go for a Salesforce Data Entry Source. Salesforce will automatically create a Data Extension with all the fields chosen in the Salesforce Data Entry Source definition process.

When you choose to start from an already existing Data Extension, the personalization is quite straightforward: all the fields in the Data Extensions are available to you for personalization purpose, nothing more, nothing less.

Yet, when you go for the Salesforce Data Entry Source, two paths open to you. You could use the system generated Data Extension fields to personalize your content, but this requires a bit of a more data-savvy mindset. Else, you can use Marketing Cloud Attributes that are mapped to Salesforce Fields. This is were the trick lies. Despite Marketing Cloud Attributes personalization working seamlessly when sending an email to Salesforce Campaigns/Reports through Send Flows (manual sends), the same cannot be said when automatically sending the same email within Journey Builder to a Salesforce Audience (be it Salesforce Data or Salesforce Campaign Entry Source). In fact, Marketing Cloud Attributes mapped to Salesforce Account fields will nor display, nor work.

Workarounds:

For Emails in Journeys with Salesforce Data as Entry Source, make sure you personalize your email based on the name of each field of the system generated Data Extension. There, you will find all the Salesforce fields included in the Entry Data step. You will therefore be able to include fields from related objects! Mind you, their syntax looks like the following: %%Object:FieldName%%

For Email in Journeys with Salesforce Campaigns as Entry Source, you will have to create additional fields in Salesforce, on the Contact object. These will be Formula fields that will fetch related objects fields (such as Account Fields). You will then need to change the Marketing Cloud Attribute mapping towards the newly created Salesforce fields, located on the Contact Object.

I hope this will help you in your journey to success with Marketing Cloud πŸ™‚

Best,

Stef

Interactive Email Marketing

It’s LIVE!

Here we go, the much awaited piece of marketing tool is finally available on Salesforce Marketing Cloud! 2 days earlier than expected for some of us!

As a reminder, this feature allows Marketers to create emails with fillable forms (directly within the email client!) that, on the push of a button, send information straight into the Cloud! Who said magic didn’t exist?! ^^

However, as Marketing Cloud Specialists (soon-to-be) or Consultants (soon-to-be), we know that there are a few tweaks to be taken into account for such “magic” to happen. In this post, we will delve into this feature, technically speaking, to the extent of the knowledge we have so far, of course ^^. No bullshit!

1. The CloudPage

First thing first, create a CloudPage. It is a mandatory step.

a. Go to CloudPages, create a new collection if you need one, and create an Interactive Email Page.

This CloudPage will basically serve as destination page after the customer has filled the Email Form.

That’s what you end up with after having clicked on “Create Interactive Email Page” (see image above)

b. Click on the “Email Form Block” in order to edit it (image below).

c. At this stage, you will be able to choose the content that will display after the subscriber has successfully submitted the form. That could be either nothing, either a Block from Content Builder (that you will have previously built, separately) or a link to a landing page containing a “thank you” note.

2. Back to Email Studio, in Content Builder!

It’s now time to implement our Interactive Email Form in our nice Email.

Everything happens in the Interactive Content section, in the Content Blocks available to you. There should be an “Email Form” Block like so:

a. Drag and drop that block in your email layout. You will end up with the following interface on the left hand side of the email you are building:

b. You will be able to choose among different layouts that will ease the form creation or let you build it from scratch. For this tutorial, let’s go with the “Review” form type!

c. The first step you want to complete is selecting the destination CloudPage you previously created! Simply browse the collection in order to reach it ^^

d. Second, fill the “Response Capture” as follows:

choose “Create a data extension automatically”, if you haven’t created a Data Extension to host the survey answers, yet. You will then have to set a Name. For our tutorial, I chose this option and called the DE “Interactive Email Test Survey DE”

undefined

else, choose “Use an existing data extension”

Let’s stop and make a step back to see what we have so far:

  • We have a CloudPage that serves as destination page after form filling
  • We have a Form Block within your Email connected to the destination CloudPage
  • We have a Data Extension created to host this survey answers. This Data Extension is EMPTY: it doesn’t have any attribute nor records (obviously)

e. The next step is to delve into the different fields that you want in your form. In this case, we already have three fields automatically created by the “Review” template chosen at the beginning.

f. In order for this form to work, you need to affect each field of this form to an attribute of the data extension, wether the field has already been created by the template chosen or it has to be created “by hand”. To do so, click on the blue pen on the right of the “Choose your rating” field. You will end up with an error, but no worries! ^^

In this tutorial, because we have created a Data Extension within the Form Creation interface, we have no attributes in our Data Extension. Go ahead and click on “Create New Attribute”, give it a name and an attribute length (important: adding a new field in your form, you will be prompted to first choose a type for your data extension attribute!) Proceed with this “f” step for each field.

g. Then, edit the different requirements and content options that you want to set for this Input.

h. In this tutorial we will also add two Hidden Fields in order to pass subscriber’s information such as the Subscriber Key thanks to the AMPscript variable (%%_subscriberkey%%) or the Emaill Address (%%emailaddr%%).

i. In the “Design” tab, take a particular attention at the Fallback State functionality. This functionality allows to show a different content for email clients that do not support interactive elements (such as our beloved friend Outlook…). You can either choose to show a “void” content (which is not recommended!) or a Block from Content Builder (i.e.: with a call to action to an alternative CloudPage or webpage hosting your form on the Web!).

Once you’re happy with the look & feel of the form…

3. Time for the send!

Here’s how the Interactive Email Form we have created in this tutorial appeared in my Gmail inbox. Seems like Google is more comfortable with radio buttons than animations πŸ˜›

That ain’t no animation, mate!
From the Gmail Mobile App on iPhone!

What about Data?

Here is the result in the Data Extension created in this Tutorial.

As you can see, a specific Id has been randomly created for each submission, and the other record attributes are filled with the value inserted in the interactive form in Gmail (see Gif above).

The email address and Subscriber Key are passed as variable in the Hidden Fields through the URL and end up in the correct data extension attributes.

I hope this tutorial was useful and see you next time !

P.S.: a special kudo to Cyril Louis, Salesforce MVP, for his benevolence!

Journey Builder – The Entry Criteria conundrum

Little is told about the fine tuning of Journeys in Journey Builder. I say “fine tuning”, I should rather say essentials!

When you create a journey with a Salesforce Data Entry Source, you need to first select the object you want to use, either Leads, Contacts or Person Accounts (more on that on another piece of writing coming soon^^).

Now, it’s time to determine criteria… and that’s what this post is about. It seems like a “Captain Obvious” thing, but believe or not, it took me a long time to figure it out!
When you set up an Entry Criteria, you notice that you have the choice between “Is Created” or/and “Is Updated”. Are we talking about Objects or Fields, you might ask yourself? Actually, the two of them…

When “Is Created” is ticked, it refers to the Object creation.

When “Is Updated” is ticked, it refers to the Field of the Object update.

Sure, for the “Is Created” condition things are quite clear: when a new contact record is created, the record enters the journey.

For the “Is Updated” condition, it is important to understand that the record will enter the journey only when the specified field is updated. It has nothing to do with the update of other fields of the record. Let’s take the example here below:

The Contact record will enter the journey only when the “Email Opt Out” field is updated (=True). In the case where another field of the Contact record is updated and that “Email Opt Out” was already equal to “True”, the Contact record would not enter the journey. That’s a nuance that it important to understand in order to make your Marketer’s life easier when creating journeys ^^.

If you want a bunch of Contact Records having already “Email Opt Out = True” to enter your journey, a solution is to use “Data Loader”. Create a report isolating records you need to update. Make sure you include the Record ID in the report. Download it in a CSV file format. Update the field as wanted and upload it back with Data Loader. N.B.: your journey must be active before uploading the CSV file!

There you go, I hope this little tip will help you through this powerful yet complex tool!

Right, I am off to the Marketing Cloud Consultant Certification Exam. Wish me luck!

UPDATE 05.08.2020
I met another limitation in terms of Criteria interpretation in Journey Builder. TheΒ documentationΒ is a little misleading when it states: “The rule does not run when a record that previously met rule criteria is updated”. Makes it sound like a record can’t qualify again.

So for “updated” to work, the record needs to be updated from something different than the entry criteria condition, to something that equals the condition. For example, entry criteria is “some_number_field > 0”. If the value is 1 for first entry and you change to 2, it wont trigger and re-enter. You would need to change that value to 0 to disqualify and then to 2 (or anything greater than 0) in order to qualify.

I found the explanation above on Salesforce Stack Exchange, provided by Josh De Blank, here. Cheers!

Design a site like this with WordPress.com
Get started